Monday, April 15, 2013

Unit 13 Activity 6

Unit 13 Activity 6: Environmental Portraits

Connect with someone new and create three environmental portraits. At least one image should demonstrate how you have directed them towards a relaxed expression and body posture. Discuss the process or direction.


All three of these photos are examples of environmental portraits. In the first image, Katrina is editing a photo on Adobe Photoshop. It was important to capture her sitting relaxed, so I told her to just do what she would normally do while editing. 

In the second photo, Katie is doing a gymnastics routine. Again, I wanted to capture her focused, as if the camera was not there, so I told her to go through a routine that she had been practicing earlier. 

The third image is the most relaxed of the three. Elizabeth is demonstrating how to use pastels, which can sometimes be stressful. In order for her to look relaxed, I told her that she need a slight slouch (because no one sits perfectly straight... At least not in high school), and I wanted her face to be relaxed as well as how she held her arms.  


Thursday, April 11, 2013

Unit 13 Activity 5

Unity 13 Activity 5: Portrait Details

Find one portrait image that has included significant or informative detail. Describe the importance of the additional information and how it is likely to be read by the viewer.


     Instead of just a portrait of a soccer player in a studio, he is actually out on the field about to kick a ball. The ball, stadium, and coloring of the sky make this portrait much more interesting. These extra details are important because they help create a story in this single photograph. Viewers are likely to look at this photo and consider whether or not this is a professional soccer player or even consider where this could be taking place. This added detail adds one more layer of depth to the photo, making it that much more interesting to look at.

Resources:
Check out this image here!

Thursday, April 4, 2013

Unit 13 Activity 4

Unit 13 Activity 4: Depth of Field

Photograph the same subject varying both the depth of field and focal length of the lens. Discuss the visual effects of each image.


The first image is an example of shallow depth of field and the second image is an example of great depth of field. In the first image, the subject is clear and in focus which eliminates the distracting trees that are present in the background. With the great depth of field, there is more clarity and it adds just another level of "depth" to the image.

Tuesday, April 2, 2013

Unit 13 Activity 3

Unit 13 Activity 3: Portraits with Multiple Subjects

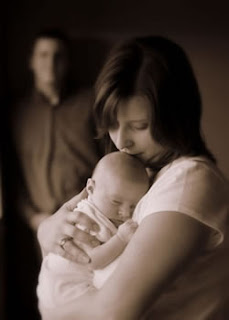
Collect four portrait images with two to five subjects. In at least one image the subject should have been placed in the foreground Comment on the arrangement of the subjects in relation to the camera and the effectiveness of the design.


This layering of subjects creates an interesting photo. It really allows the mother and baby to be the center of attention, but the father is still there in the background.


This is an extremely unique arrangement for a family of five. Having the parents hold the picture frame and the children sitting inside the frame makes for a fun-loving picture.


Organized chaos is always fun. This arrangement of the four subjects keeps your eyes moving from one person to another and is an excellent portrayal of a loving family.


It is evident that this particular arrangement was meant to be symmetrical, but it would have been much better if the son in the middle was centered better. It would have been a better use of space, but overall, the idea was good.

Resources:
Look at more of these photographers work here, here, here and here!

Unit 13 Activity 2

Unit 13 Activity 2: Portrait Photos

Find four portraits that demonstrate the different ways a photographer has framed the image to alter the design and content. Discuss the vantage point, depth of field and subject placement in all of the images.


The varied vantage points in these images are aesthetically pleasing to the eye. Coming from straight on creates a dramatic effect, while coming at a slight angle softens the feel of the image. 

In the first two photos, the portraits are taken from far away with a shallow depth of field so the sole focus is the subject instead of the background. The trees above the girl in the first image help frame the top part of her body, and the lockers and street frame the girl in the second image. 

The blue cloth, in the third image, surrounds the woman's face while the color of the cloth really accentuates her steel gray eyes. By framing this picture, the viewers attention immediately goes to the striking eyes of the model, which is the main focus of this image.

In the fourth image, the hat and the models arm are what frame her head. The framing is important here because is separates the model from the bright light that could easily overtake the photo if her hat and arm did not block it. 

In all of these photos, the subjects take up a majority of the image, whether they are placed in the center, fill the frame, or are in a third of the image. 

Resources:
If you liked these portrait shots, check out the photographers websites here, here, here, and here!